Contact Us

Use the form on the right to contact us.

We try to respond email within 24 hours.  We ar a small studio so if we are on site there may be a bit of a delay but email is usually faster then telephone. thank you for your patience!


As of March 4, 2017, we are having problems with this email link. Please Use your own email program to write to us at info@annwallace.com. Thanks for your patience!

Box 79341
Los Angeles, CO 90079

213-614-1757

Textiles for early twentieth century and Arts & Crafts decor. We've been sewing for over 20 years. Curtains, shades, bedding accessories and many more resources for those who admire vintage style.

AnnsStudio.jpg

Ann's Vintage Textile Blog

<a href="https://www.bloglovin.com/blog/19044579/?claim=wwkqq5ryqab">Follow my blog with Bloglovin</a>

I will blog once a month, approximately on the 15th


Masking the Virus.....Then and Now

ann wallace

Masks as protection from disease have been with us for many centuries. They were ubiquitous of course during the Great Influenza. The classic recognizable shape has not changed much, in spite of technological advances in materials and better protection for front line health care workers.

Nurses making masks in 1918.

Nurses making masks in 1918.

We think we’ve developed a better pattern. It is wired so it fits over the nose bridge to prevent glasses from fogging and has a shaped front or “snout” for easier breathing or to fit over an N95 mask. We’ve made it so you can add pockets for coffee filter paper if you like but it provides 3 layers of protection without the addition of a filter. To make your own, use a high quality cotton or cotton poly fabric. A half yard will be more than enough to make a mask and ties. An old high thread count sheet is perfect if you want to make several masks. Wash fabric before cutting.

Click here for a PDF download of our mask pattern

PATTERN INSTRUCTIONS

To make, cut four pieces of the main pattern - two for front and two for back (seam allowance is included in the pattern) and two pieces of the pocket pattern.

Assemble mask back with filter pockets. Turn under the pocket edges 1/4” twice, top stitch hem and press. Make a sandwich of the two pocket pieces between the two back pieces. Remember that the 2 backs and two pockets are right sides together but ea…

Assemble mask back with filter pockets. Turn under the pocket edges 1/4” twice, top stitch hem and press. Make a sandwich of the two pocket pieces between the two back pieces. Remember that the 2 backs and two pockets are right sides together but each pocket piece is wrong side to the right side of its back. Stitch the curved “snout” or center seam with a 1/4” seam allowance. This narrow seam does not need to be clipped. Press seam to one side.

Seam and press center “snout” seam of mask front.

Seam and press center “snout” seam of mask front.

Seam mask front to back at TOP EDGE ONLY with 1/2” seam allowance. Trim seam to 1/4” at center nose curve and clip the rest of the seam.

Seam mask front to back at TOP EDGE ONLY with 1/2” seam allowance. Trim seam to 1/4” at center nose curve and clip the rest of the seam.

Turn and press.

Turn and press.

Insert five inches of pipe cleaner or other washable flexible wire centered at the nose curve BETWEEN the front and the back on the INSIDE. I like plastic (washable) twisties as they are already cut. Pin in position or simply hold.

Insert five inches of pipe cleaner or other washable flexible wire centered at the nose curve BETWEEN the front and the back on the INSIDE. I like plastic (washable) twisties as they are already cut. Pin in position or simply hold.

Top stitch along top edge from pocket edge to pocket edge, enclosing the wire in a casing. If you find this difficult, sew the casing first and then thread the wire through, stitching both ends when you’re done. Turn mask back inside out and seam bo…

Top stitch along top edge from pocket edge to pocket edge, enclosing the wire in a casing. If you find this difficult, sew the casing first and then thread the wire through, stitching both ends when you’re done. Turn mask back inside out and seam bottom edge with a 1/2” seam allowance. Turn mask right side out again.

Make or purchase four feet of tie cording, twill tape or other sturdy material. Turn under mask sides 3/4 inches twice and top stitch. At this point, if you’re making the mask for a specific person, you might do a fitting as people’s face widths can…

Make or purchase four feet of tie cording, twill tape or other sturdy material. Turn under mask sides 3/4 inches twice and top stitch. At this point, if you’re making the mask for a specific person, you might do a fitting as people’s face widths can differ quite a bit. Thread the cording through the side casings to make a loop at the mask bottom.

Bottom loop goes over head and around neck. Top goes over ears and ties in back.Tip: if you wear glasses and can position them like mine OVER the mask, it will minimize fogging.

Bottom loop goes over head and around neck. Top goes over ears and ties in back.

Tip: if you wear glasses and can position them like mine OVER the mask, it will minimize fogging.

Cleaning a Vintage Rug

ann wallace


The classic carpet for a bungalow is a flat weave area rug like a Navajo or Mexican weave or a Kelim. This rugs can be very valuable or inexpensive vintage or souvenir products and both can have their place. A valuable rug should ALWAYS be cleaned by a professional but small and inexpensive pieces can be cleaned at home. I live in a loft with hardwood floors throughout so I have a very inexpensive vintage Kelim runner in my kitchen area to protect the floor. It is wool woven on a cotton weft, like many of these rugs and between my dog and my cooking, can get VERY dirty! It's a good choice for this kind of rough use as tightly woven Kelims were often made in the first place for practical, everyday use. They are readily available today for very little money. 

DirtyRug

First I sweep the rug. This is a little bit hard on the wool fibers and an old fashioned rug beater would be better but I don't have a back yard. If you have an old fashioned shake out porch (old house often have a little balcony off the upper floor that really was there to shake out rugs, bedding etc), you have an ideal place to beat or shake your rug.

RugAndBroom.jpg
Here you can better see the dog hair that you can also see in the first close up.

Here you can better see the dog hair that you can also see in the first close up.

Notice the pink tint from the wool fibers along with the grit and dog hair. I also vacuum the rug on both sides to get up the finer grit. Most vacuum cleaners have a flat rug setting that lifts heavy brushes to protect the flat surface. These brushes are harder on the rug surface than your mild sweeping so avoid using them.

IMG_3232.jpg

I actually WASH this small rug in my washing machine. The cotton and wool are essentially pre-shrunk from years of cleaning and blocking. Before you wash, however, it is important to test for color fastness. I have washed this rug many times and know that this nice red is actually and surprisingly quite staple so I'll show you a color test on some vintage embroidery.

Old silk embroidery thread is famously non-colorfast. I rubbed this purple thread with a wet cotton swab. Note the lavender tint- this embroidery would be a disaster to wash.

Old silk embroidery thread is famously non-colorfast. I rubbed this purple thread with a wet cotton swab. Note the lavender tint- this embroidery would be a disaster to wash.

RugSpotClean.jpg

I spot clean the worst spots with an enzyme cleaner like Shout or OxyClean and cold water. These work best on protein stains which, since this is a kitchen rug, is mostly what I have. Do NOT leave this on more than a few minutes before washing or it may fade colors. Do not use bleach on wool - it will discolor and definitely weaken the fibers.

Place in washer with a few small items to balance the load. Use a mild soap and nothing else. Run the washer on "large load" so the rug has plenty of room to slosh around and use cold water.

Place in washer with a few small items to balance the load. Use a mild soap and nothing else. Run the washer on "large load" so the rug has plenty of room to slosh around and use cold water.

WrinkledRug.jpg

Watch the washing and take the rug out right away. I purposely did not do this for this picture so you can see that in spite of the spin cycle wrinkles the rug will eventually be OK but your job will be easier if you avoid this.

Block the rug. Having a friend help you pull on each end is helpful. Walk on it in bare feet and stretch.

Block the rug. Having a friend help you pull on each end is helpful. Walk on it in bare feet and stretch.

Wool has memory and the rug will flatten more as it dries. Do dry it flat if you can. Hanging over a rod as it dries can make a crease that is hard to get out. You CAN iron your rug. Spritz with a bit of water and use a pressing cloth.

Wool has memory and the rug will flatten more as it dries. Do dry it flat if you can. Hanging over a rod as it dries can make a crease that is hard to get out. You CAN iron your rug. Spritz with a bit of water and use a pressing cloth.

Over a few days of use the rug will flatten some more.

Over a few days of use the rug will flatten some more.

Remember, valuable antiques should be cleaned by a professional carpet expert. This kind of cleaning with gentle soap is easier on your everyday rugs than standard professional dry cleaning. Always check for color fastness!

Follow

Vernacular Interiors From Keith's Magazine

ann wallace

Many years ago I was given copies of some treasures photos of REAL Arts and Crafts interiors. they were old negatives of pictures taken for Keth’s Magazine, found, I’m not kidding, in a barn in Minnesota where I then lived. I love these photos and have referred to them frequently over the years. You’ll see some of them scatter over the website.
Looking at old photos is a bit different. High contrast dark colors and lights pale colors - this, with less controlled lighting than we're used to, can make them difficult to read. Reds photograph as very black, blues fade, unfiltered and controlled lighting makes hot spots. Values tend to be flattened out so that some wood grains almost   look like tiger strips (note floors in these pictures).
Of course, many bungalows were starter homes and this seems to show in some of the furnishings. A young couple may not have a couch yet or may be making do with a very small dining room table. There is quite a bit of wicker used indoors - this would have been considered somewhat inappropriate, but it was less expensive than wood furniture
Look for hardware, lighting fixtures, moldings, window cover and other textiles ideas in old photos.

Keith'sMag1.jpg

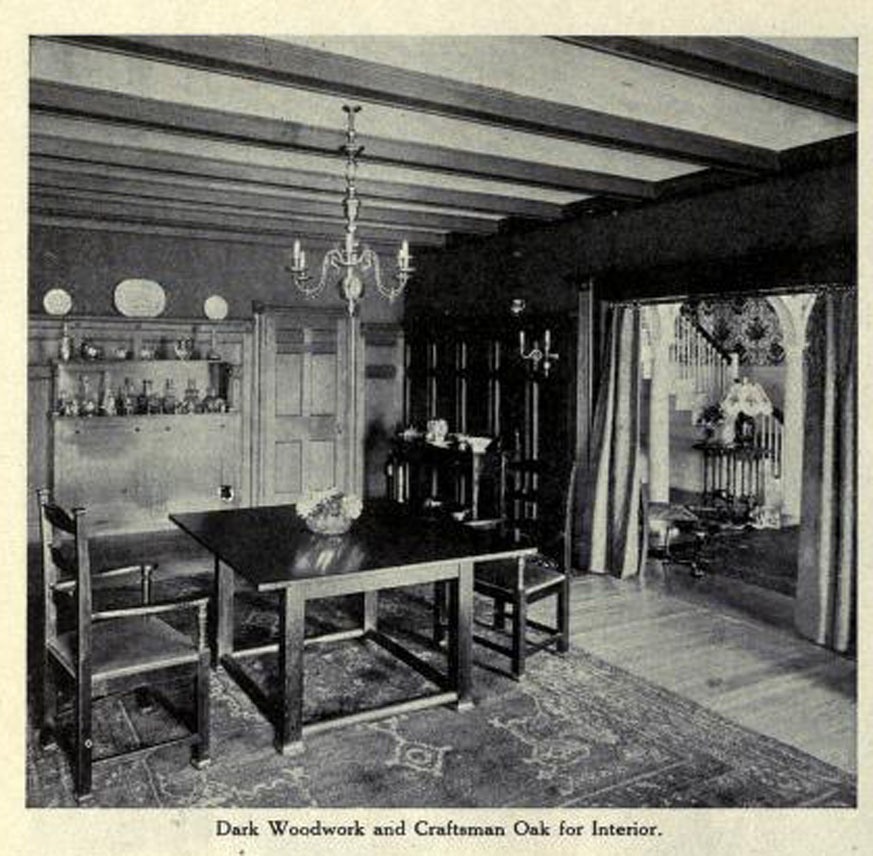
Craftsmen oak and beautiful beams, but look at the colonial revival hall seen through the archway, not to mention the out-of-place chandelier. On the other hand, I think the early American-ish chairs with their turned work, look just fine. Notice the plates displayed on the very high plate rail and the portieres in the archway. There's an entertaining sense of the owner's personality in the lavish display of decanters on the sideboard.

Keith'sMag2.jpg

Here's a room with some really lovely lighting fixtures and what I suspect is a beautiful tile fireplace if only we could see it better. There is a nice pendent border at the ceiling molding - I THINK in a wallpaper although it may be a complex stencil.

I've noticed that in these old dining room pictures most the chairs are against the wall and out of the way. This would be easier on the floors and carpets which can get quite abused from the endless moving of chairs at the table. It's unusual to see French doors without curtains so I think these must open to a very private garden or patio.

Note the Queen Anne style chairs. I think the period style can work very well in a Craftsmen interior if you want to mixed it up or just have some old family furniture.

Keith'sMag3.jpg

This room would look less cluttered with the contrast in the photo were not so high. Still, even with built-ins including window seats, they managed to squeeze in a nice Craftsmen settee, a Morris chair and and arm chair as well as a library tablea desk and a particularly out of place wicker chair. Note that all though the curtains are very simple, they DO have a valance on the front windows. The shadow that you see is probably from a porch roof or an awning although there very likely are shades as well.

Keith'sMag5.jpg

This room is really more Art Deco then Craftsmen based on the enameled furniture and the suggestion of that classic Deco color, eau de Nile. I couldn't resist the window treatment though -  a typical use of multiple sheers - 2 per window for a total of SIX - with over curtains and a hint of shade behind the sheers. Without air conditioning, all these would be called in to play to keep the room cool and also to protect the decor from sunlight.

And below, some final color!. Fabric was often printed in narrow width, directional, border fabrics specifically to be used for draperies - just finish each end and you're good to go. In the black and white photos of the times these cannot be appreciated so it's lovely to see some actual fabric from the collection of Diane Ayres.

VintagePrintCurtain.jpg